When preparing for any first job interview, getting ready for a wedding or just wanting to look good while at work, it is important to know how to put on a tie. Nonetheless, many men do not only shun away from wearing ties but also have issues when they have to put one on.
If you have ever looked into the mirror and tried to correct a wonky knot and adjust a short or a long tie, then it is okay; you are not the only one who has had to do this. The thought of tying a tie may appear difficult at first but with the basic principles in place, tying a tie can practically be done with ease. It is similar to how laces are tied.
In the comprehensive tutorial prepared for you, we will cover all these aspects: a brief history of the necktie and the most used knots, detailed how to tie a tie step by step instructions on how to tie a tie, how to do it safely without making serious mistakes, and a couple of throw it on tips about what to wear in different eras. At the finish, doing simple ties won’t be any challenge for you.
A Brief History of the Necktie
When preparing for any first job interview, getting ready for a wedding or just wanting to look good while at work, it is important to know how to put on a tie. Nonetheless, many men do not only shun away from wearing ties but also have issues when they have to put one on.
If you have ever looked into the mirror and tried to correct a wonky knot and adjust a short or a long tie, then it is okay; you are not the only one who has had to do this. The thought of tying a tie may appear difficult at first but with the basic principles in place, tying a tie can practically be done with ease. It is similar to how laces are tied.
In the comprehensive tutorial prepared for you, we will cover all these aspects: a brief history of the necktie and the most used knots, detailed how to tie a tie step by step instructions on how to tie a tie, how to do it safely without making serious mistakes, and a couple of throw it on tips about what to wear in different eras. At the finish, doing simple ties won’t be any challenge for you.
Types of Tie Knots: Which One Should You Use?
There are dozens of tie knots in existence, but most men only need to master three to five. Here’s a quick overview before we get into the full instructions.
| Knot Name | Difficulty | Best For | Collar Type | Knot Size |
|---|---|---|---|---|
| Four-in-Hand | Easy | Everyday, casual, beginner | Any collar | Small / Slim |
| Half Windsor | Medium | Business, interviews | Spread or semi-spread | Medium |
| Full Windsor | Medium | Formal events, presentations | Wide spread collar | Large |
| Pratt (Shelby) | Medium | Versatile, business casual | Spread or semi-spread | Medium |
| Kelvin Knot | Medium | Everyday smart casual | Any collar | Medium |
| Bow Tie | Hard | Black tie, formal galas | Wing / tuxedo collar | Classic |
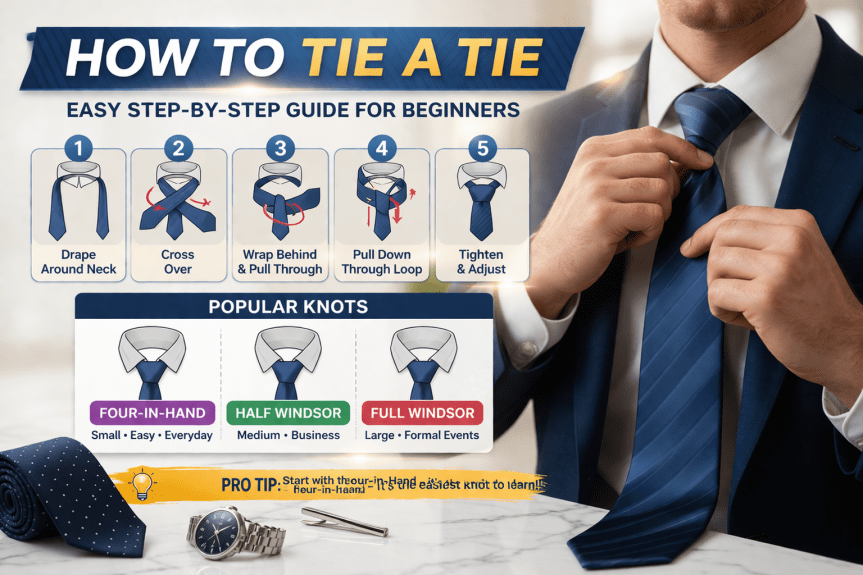
How to Tie a Tie: Step-by-Step Instructions for Every Major Knot?
Before you begin, a few quick basics to keep in mind:
- Stand in front of a mirror.
- Drape the tie around your neck, under the collar, seam facing inward.
- The wide end (the fat end) should hang on your right side.
- The narrow end (the thin end) should be on your left.
- The tip of the wide end should reach your belt buckle when you’re done.
The Four-in-Hand Knot — Best Easy Tie Knot for Beginners
The Four-in-Hand is the most popular and the easiest tie knot for beginners. It’s slightly asymmetrical, which gives it a relaxed, natural look. This is your starting point if you’re just learning how to tie a tie for the first time.
Step-by-Step Instructions:
- Drape the tie around your neck. The wide end should hang about 12 inches lower than the narrow end on your right side.
- Cross the wide end over the narrow end from right to left.
- Wrap the wide end underneath the narrow end, from left to right.
- Bring the wide end over the narrow end again from right to left. You’ll see a horizontal band forming at the front.
- Pull the wide end up through the neck loop from underneath.
- Slide the wide end down through the horizontal band you created at the front.
- Tighten the knot by holding the narrow end and sliding the knot upward toward your collar.
- Adjust until the tip of the tie just touches the top of your belt buckle.
Pro Tip: If your tie ends up too short, start with the wide end hanging lower. If it’s too long, start higher. It takes one or two tries to nail the length — and that’s completely normal.
The Half Windsor Knot — The Perfect Business and Interview Knot
The Half Windsor knot tutorial is one of the most requested lessons for men stepping into the professional world. This knot is symmetrical, medium-sized, and works beautifully for job interviews, business meetings, and smart-casual events. It’s one of the best tie knots for suits.
Step-by-Step Instructions:
- Drape the tie around your neck. Wide end on the right, about 12 inches lower than the narrow end.
- Cross the wide end over the narrow end from right to left.
- Bring the wide end up through the neck loop from underneath.
- Bring the wide end back down to the left side.
- Pass the wide end behind the narrow end, going from right to left.
- Bring the wide end up through the neck loop one more time.
- Slide the wide end down through the horizontal loop at the front of the knot.
- Tighten gently and slide up to the collar.
Pro Tip: The Half Windsor looks best with spread-collar or semi-spread collar shirts. The wider collar gives the medium-sized knot room to breathe without looking crowded or forced.
The Full Windsor Knot — The King of Formal Tie Knots
The Windsor knot steps are a bit more involved, but the result is worth every second. This is the most impressive and prestigious knot in the formal tie knot guide. It’s wide, symmetrical, and commands instant attention. If you’re the best man at a wedding, giving a big presentation, or attending a gala — this is your knot.
Step-by-Step Instructions:
- Drape the tie, wide end hanging 12 or more inches lower on your right side.
- Cross the wide end over the narrow end from right to left.
- Bring the wide end up through the neck loop from underneath.
- Bring the wide end back down to the right side.
- Pass the wide end behind the narrow end from right to left.
- Bring the wide end up through the neck loop again, then fold it down to the right.
- Cross the wide end over the front of the narrow end from right to left.
- Bring the wide end up through the neck loop once more.
- Slide the wide end down through the front horizontal loop.
- Tighten carefully and adjust until the knot sits snugly and symmetrically at the collar.
Pro Tip: The Full Windsor uses more tie length than any other knot. If you’re tall, opt for an extra-long tie. Standard-length ties can come up short — literally.
The Pratt Knot (Shelby Knot) — A Hidden Everyday Gem
The Pratt knot, also called the Shelby knot, is an underrated star in the world of tie knot styles for men. It produces a clean, medium-sized knot similar to the Half Windsor, but it starts with the tie inside-out, creating a slightly different drape and texture. It’s one of the best simple tie knot instructions to learn as your third knot.
Step-by-Step Instructions:
- Start with the tie inside-out (seam facing outward), wide end on the right, both ends at roughly the same length.
- Cross the wide end under the narrow end from right to left.
- Bring the wide end up through the neck loop from underneath.
- Fold the wide end back down to the right.
- Cross the wide end over the front of the narrow end from right to left.
- Bring the wide end up through the neck loop from underneath one more time.
- Slide the wide end down through the front loop.
- Adjust and tighten gently.
Pro Tip: Because the Pratt uses less tie length than the Windsor knots, it’s a great choice for shorter ties or for shorter men who struggle with standard tie lengths ending up too long.
How to Tie a Tie for Beginners: The Simplest Method Possible?
How to tie a tie: When too many steps don’t seem feasible for you, the sure-fire approach towards tying a tie is simply decomposing it into three simple activities with a simple answer: how to tie a tie.
Part 1 – Wearing: Widen the first part further towards your left shoulder as the first part lies on top of the second part.
Part 2 – Sheathing: Pass the wide part upwards, through and over the neck loop.
Part 3 – Knotting: Pass the broad end downwards through the side, tighten.
That is basically the Four-in-Hand knot. Many male and female wearers incorporate this knot. One’s familiarity with various knots will make them calmer and more intuitive.
Common Mistakes to Avoid When Learning How to Tie a Tie
Even those individuals who have been wearing ties all their life make these mistakes. Know them and you will always win when it comes to trends and wardrobe styling.
- Incorrect measurement of the length of the tie
The point of a tie must reach the center of the belt. In no other case should this rule be broken. If this rule is violated, undo everything and re-tie the tie again as you make sure the broad part is raised or taken down as needed.
- Omitting the dimple
In fact, a true dapper gentleman would never wear a tie without an elegant dimple just under the collar. For this purpose, clasp the fabrics beneath the knot with your fingers and keep holding it as you fasten the knot. This recollection now helps you a great deal to enhance your perceptions.
- Over tightening knot
It also simply looks silly and overly tight knots place tension even more than required on the tailoring of the tie itself. Knot the tie till such a point that it fits the collar with a small, clean dimple that is not stretched.
- Wearing a knot size that doesn’t agree with the shirt collar
Restricted Keywords and Key Phrases List:
How to tie a tie
Human approach: It is disconcerting to look at the large Windsor knot fitted into a small collar. Similarly, a small Four-in-Hand within a big collar is recklessly inappropriate in appearance. Ensure your knot corresponds accurately to the collar width.
- Wearing the tie without steaming or ironing is a mistake
Wearing a wrinkled tie will waste all the efforts. Consider a garment steamer and use it for a couple of inches away from the fabric. If you do need to use an iron, apply a thin pressing intermediary over the fabric between the iron and the tie, and do not use the iron for heating – use only the steam option on low.
- Pulling the knot out after you have worn it
Avoid pulling out the knot. Instead, untie it in the way it is tied. Pulling causes stretching of the silk and damages the invisible component of the tie – the canvas within the tie, usually, for good.
How to tie a tie and make the bow knot, it is easy and simple even for a child.
Tips for Choosing the Right Tie
Knowing how to tie a tie step by step is only half the equation. Choosing the right tie for the occasion matters just as much.
Fabric
Silk — The gold standard. Luxurious, smooth, and ideal for formal or business occasions.
Wool — Textured and rich, perfect for autumn and winter looks.
Linen — Light and relaxed, great for summer weddings and outdoor events.
Polyester — Budget-friendly and durable, a solid everyday option.
Width
Tie width should roughly mirror your lapel width. Standard width (3 to 3.5 inches) works with most classic suits. Slim ties (2 to 2.5 inches) pair well with modern slim-cut suits and narrow lapels.
Pattern and Color
Solid ties are the most versatile and beginner-friendly choice for matching.
Striped ties (regimental stripes) are a timeless business staple.
Dotted ties add personality without being too loud.
Patterned ties (paisley, plaid, floral) work best for casual or creative settings.
Pro Tip: When in doubt, a solid navy or deep burgundy tie coordinates with almost any shirt and suit combination.
Tie Styling Guide: How to Tie a Tie for Different Occasions
The right knot and tie can make or break your outfit. Here’s exactly what to wear for every major situation.
Job Interview
Best Knot: Half Windsor
Best Colors: Navy, dark blue, burgundy, charcoal grey
Avoid: Loud patterns, novelty ties, neon or overly bright shades
Why it works: The Half Windsor reads as polished and professional. It tells the interviewer you’ve dressed with care and intention — without trying too hard.
Wedding (Guest or Groomsman)
Best Knot: Full Windsor or Half Windsor
Best Colors: Coordinate with the wedding color palette
Avoid: Black ties unless it’s a black-tie event; avoid overly casual knots
Why it works: Weddings are celebratory and formal. A Full Windsor shows you’ve put thought into your outfit and respect the occasion.
Business and Office
Best Knot: Half Windsor or Pratt
Best Colors: Classic solids or subtle patterns in muted tones
Why it works: A medium-sized, symmetrical knot projects confidence and competence — exactly the impression you want in a professional environment.
Casual Smart and Date Night
Best Knot: Four-in-Hand
Best Colors: Deeper tones, interesting textures, subtle patterns
Why it works: The slightly asymmetrical Four-in-Hand has an effortless, relaxed charm. It says you’re well-dressed without looking like you’re trying too hard.
Black Tie Gala or Formal Event
Best Knot: Bow tie (with a tuxedo) or Full Windsor (with a formal dark suit)
Best Colors: Classic black, crisp white, deep jewel tones
Important: Never wear a regular necktie with a tuxedo. A bow tie is the correct choice for true black-tie dress code.
Frequently Asked Questions
What is the easiest way for a beginner to learn how to knot a tie?
Learning a tie knot as a first-time learner, most people recommend starting with the easiest knot: the four-in-hand. It is less demanding than other types of tie knots and looks good with almost all kinds of collars, and is easy to learn in just a few seconds. It is one of the most appropriate learning curves if you are a beginner and want to learn to tie a tie in a simple, fast and dependable manner.
When learning how to tie a tie, how long should it be?
When practicing how to tie a tie, the tip of the wide end should land exactly at the top of your belt buckle — not above or below it. This is a key rule in mastering how to tie a tie properly. If the length looks off, adjust the starting position of the wide end before you begin tying.
What’s the difference when learning how to tie a tie with a Windsor vs Half Windsor?
When it comes to learning how to tie a tie, it is crucial to know the various styles of knots. The Full Windsor provides knot symmetry, and it is large and wide – just recommended for formal occasions. This applies to the Half Windsor which is a moderately smaller knot, relatively easy to use, and thus can be used on a day to day basis. If it is your first time learning how to tie a tie, the Half Windsor can often be easily recreated and does not require much material.
Can I use any knot when learning how to tie a tie?
Not always, you will realize that when learning how to tie a tie, the thickness of the tie will also be crucial. Thicker ties accommodate big knots such as the Full Windsor but the slender ones are best coupled with small ones such as the Four-in-Hand. There is also the benefit of knowing the different techniques of how to tie a tie as it will allow you to select the appropriate knot for any clothes you are wearing.
How do I keep my knot secure after learning how to tie a tie?
Once you have learnt the trick of tieing a necktie, it is important to maintain it for a neat look. Make sure that the knot is reasonably tight (but not too much) and that the tip of the narrow end has been inserted into the keeper loop without adjusting it too many times during the day. Your description is correct: you will behave the knot as intended if you know how to tie a tie properly.
After mastering how to tie a tie, should I untie it every time?
Yes, having had practice with how to tie a tie, you must always untie it as soon as you use it, a new thing. One of the ways to ruin your tie is to remove the knotted tie. There is great importance of taking care of the tie, as it is vital in enhancing oneself how to tie a tie as well as polishing the appearance of the tie.
How do I remove wrinkles after practicing how to tie a tie?
After practicing how to tie a tie, wrinkles can sometimes appear. The best method is to hang the tie overnight so creases naturally fall out. For stubborn wrinkles, use a garment steamer. If ironing, always use low heat with a cloth barrier. Taking care of your tie is just as important as learning how to tie a tie itself.